The Garden Pond Build Log
By tony1247
10 comments
Hi Folks
Well, you did ask for more details and photos of my recent pond building exercise so here we go …..
Day 1 … and this is what i was faced with

After a couple of hours work … on my own i hasten to add
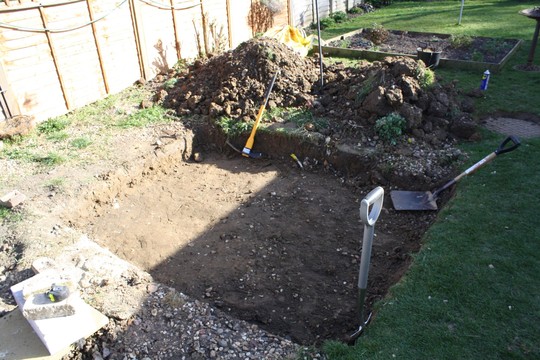
… and after a whole day digging ….


I wanted the edge raised slightly from ground level so i decided to use some cheap breeze blocks to create a square edge all the way round.
With my bricklaying skills not being very good it took nearly all day to complete this bit.

The next job was to get rid of the very sharp edges as i didn’t want the liner getting damaged.
I purchased some underfelt from the Pond shop at the same time as i bought the liner.
You can use anything for this including old carpet, carpet underlay, or just some building sand – not sharp sand as this has sharp bits in it that can wear into the liner -
I decided to use a combination of building sand and underfelt just to be safe.

The next job was to lay out the liner.
This was a mammoth task on my own as it was just a bit on the heavy side.
I laid it out on the lawn as flat as i could and then dragged it bit by bit over the hole being very careful not to get it caught anywhere.
It took about an hour to get into this position.

The next job was to get as many creases as possible out of the hole so that i could get the water in.
Once the water starts filling the hole you are almost certainly not going to be able re-jig the liner so it is best to spend a bit of time before you turn on the tap.
But hey …. worked pretty well i thought

Now it was just a matter of filling the hole with water ….
and hey … i even had some help from above as you can tell from the rain splatters.

Now i had to sort out the electrics as i needed to install two pumps and a filter box with an Ultra Violet included.
I already had power running up to my shed at the top of the garden so i decided to run a cable back down to the pond area where i was going to attach an external waterproof box with four switches.
Job Done

Next job was to make sure that the water was safe to add some fishes. This meant adding some anti stress compound to the water and leaving it for a couple of days.
When we felt it was safe we added 12 small Koi carp.
Unfortunately, the heron came down the first night and left a note thanking us for his dinner.
We lost half of the fish the first night.
With this in mind we added a small pipe to the water for the fish to hide in if it happened again.
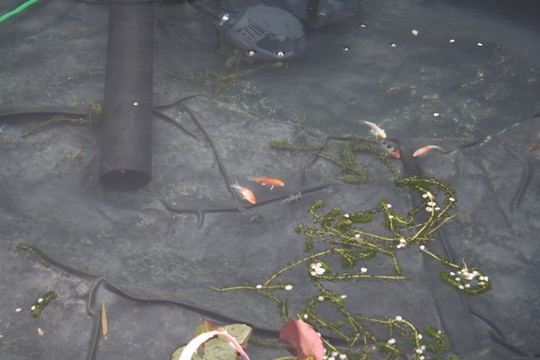

Of course we always have the inquisitive pair hanging around waiting to go for a swim.

So now the basics of the pond were in place i wanted a waterfall of some description but didn’t want to spend a fortune on ready made stuff.
We had an old paddling pool at the back of the garden that i should have thrown away years ago but decided to bring with us on the move ….. why …. you ask …. well i just knew it would have a use one day …
So i started experimenting

However, i also had to get the facing brickwork in before the bad weather set in so i made a start on that next.
Brick work not my best subject … so i made a start.


Now it started raining for quite a long time ….. weeks …. not days …. so i was limited to doing little bits here and there.
I managed to get the base of the waterfall sorted
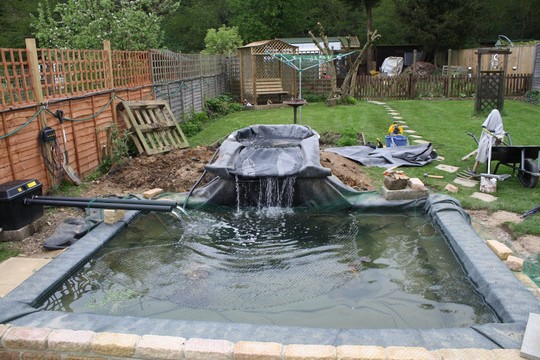
..and the area just in front of the pond tidied up …


So now about 2 months later, i still haven’t finished the brickwork as it’s only just stopped raining on my days off but the area is looking pretty tidy … even if i say so myself…


With a bit of luck over the rest of the summer i should get the brickwork completed and the capping on top.
I have managed to install some pond lights and will put up a couple of photos of the finished product later in the year hopefully.
Just to remind you what we looked like 2 years ago ….

Catch up with you all soon
 23 Jul, 2012
 11 likes
Previous post: Getting there ..... at last
Next post: Getting there .... very slowly...
Comments
thats a huge project!!! and that pond, just amazing!! what a lovely garden you now have
23 Jul, 2012
Brilliant..Got to picture 20 and wanted to strip off and dive in !
Good luck with the fish/heron.
23 Jul, 2012
I like this kind of work (I worked every inch of the way with you.lol.)
Your doing a very professional job and with the pond,and the japanese area, it will be so relaxing to sit round your table and chill out.
23 Jul, 2012
What a fantastic job you have done there Tony. The pond is wonderful and once finished looks so nice with the planting all around. The Acer is beautiful and you have worked so hard, you deserve a big pat on the back. Well done, great blog.
23 Jul, 2012
Great work, well done. that a great transformation.
23 Jul, 2012
Looks like an expensive morning coffee venue! hard work well rewarded. Quite a transformation - you must be feeling very chuffed.
23 Jul, 2012
10 out of 10 for effort, design and imagination!
Looks brilliant!
23 Jul, 2012
Tony its a credit to you and all the hard work you`ve put in has certainly paid off, I think its really smart and theres nothing to beat sitting by the pond and listening to the water bubbling away, especially after a hard days work, well done and I hope the weather is good to you so you can finish the brickwork, the whole garden looks lovely...
23 Jul, 2012

I love your photos so interesting and very helpful. My son has just made a pond in his garden and your pictures and comments will be a great helpful to him. you have made a beautiful garden all we need now is the sunshine !!!!!
16 Aug, 2012
Featured on
Recent posts by tony1247
- Jan 2019 - Garden Update
19 Jan, 2019
- The Koi pond at night
20 Jul, 2017
- 2017 - Update on new garden
19 Jul, 2017
- It;s Been A While
20 Jan, 2017
- Video of the garden last night
7 Jun, 2015
- What a difference 5 years makes
22 May, 2015
Members who like this blog
-
Gardening with friends since
26 Feb, 2008 -
Gardening with friends since
10 Sep, 2010 -
Gardening with friends since
10 Aug, 2010 -
Gardening with friends since
18 Jun, 2012 -
Gardening with friends since
8 Apr, 2010 -
Gardening with friends since
9 Aug, 2009 -
Gardening with friends since
9 May, 2011 -
Gardening with friends since
22 Oct, 2008 -
Gardening with friends since
22 Jun, 2011 -
Gardening with friends since
14 Aug, 2008 -
Gardening with friends since
1 Mar, 2008
-
Nymphaea 'Aurora' (Water Lily)

£22.99 at Crocus -
Easy Clear Filter And Fountain Pump

£139.95 at Ferndale Lodge
Brilliant ! A work of Art. You will never get tired of looking at it.
23 Jul, 2012