Snail and mice proof covers for my seed trays.
By scotsgran
15 comments
I am a great believer in recycling where possible. I use plastic trays in which the local supermarket receive their spring onions to hold 12 × 3″ × 3″ seed pots. I am a member of the SRGC and get seeds through their seed exchange. Because I pack donated seed for the Seedex I can ask for 25 packs of seeds. My OH, also a member, can order 16 packs from the catalogue. I get to choose his allowance because he is not interested in growing anything. I have found that seedlings pop up and are promptly devoured by snails or birds scratch them up and destroy them before they even reach the true leaf stage. Having seen how Bjs protects his plants using cages to keep the squirrels off I have been considering making something similar. Because mice often dig up the crocus bulbs I needed something with a small mesh to keep them safe. A lot of the seeds I get need to be exposed to cold either in a cold greenhouse or outdoors. I have looked at 6mm x 6mm wire mesh in Garden Centres or DIY stores. Prices were up to £6.99 for a sheet measuring 0.9m x 0.6m. I needed one sheet for each seed pot holder. I came across the sheets I eventually bought in a Screwfix catalogue for only £29.99 for 10 sheets. I could have bought rolls of the same product on line but I was not sure that I would succeed with this project. I would have had a lot more cutting to do and I was concerned that I would be left with something else I could not use. It was not the easiest job I have ever tackled but it impressed my OH. He kindly supplied a pair of wire cutters to make it easy to cut the wire where necessary. I am pleased enough with my efforts so far but I am designing as I go. I can hear someone ask “Why not use a cold frame?”. Most cold frames need too much floor (garden) space and I would need to fix the wire underneath to stop the beasties from climbing or burrowing in. These are so small that I will be able to place them around the garden in situations favourable to what I am trying to grow. The onion trays already have a base which allows good drainage but keeps out the unwanted. I found joining the covers up was difficult and tedious. Tomorrow I am going to see if my long arm stapler will work. Here are the first two. Suggestions on how to improve them or better ideas are very welcome.
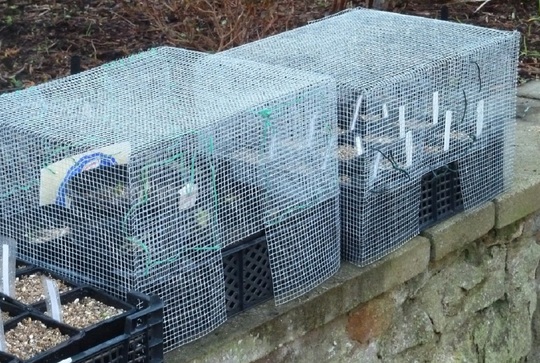
The trays stack so I might be able to get two under one cover.
Here are some of last years seedlings. They have survived the winter outside. The last photo shows most clearly how much damage they suffer from snails. They may take a few years before they flower. I did not scatter the seeds. I just put them all in together in the centre of the pot. I will need to split them eventually.


I put on Excel a pattern for cutting out the covers. NB minimum cutting. I cut on the black lines and folded on the red ones. Joining them was difficult because I had to find wire to secure them. I am going to see if I can secure them using my long arm stapler. If it holds them firmly until I can use the wire to tie them I will be happy. Looking at the photos I realised that there is a significant gap between the tray and the long side walls. I think I can sort that out by folding over a ‘hem’ around the base which will drop the entire cover. Where I cut the wire there are sharp ends to contend with I dk if there is a solution to that problem. Folding the whole wings in strengthens the cover and gives it some rigidity.

Bjs asked how I was securing the corners so here is yet another photo to show what I found works best. I had tried with thicker plastic covered wire but found it too inflexible. The long arm stapler worked well enough to hold the pieces together but the staples were not strong enough to be a permanent solution.

 4 Feb, 2018
 10 likes
Previous post: My favourite plants in 2017
Next post: Keeping tabs on what is in the garden.
Comments

Brilliant !
I am trying to work out a colour coding system to mark plant labels with Auricula types, there are 12 types that I have to learn and remember.
I need waterproof colour crayons or marker pens.
I have got a Staedler Lumocolour but its black.
Any ideas ?
5 Feb, 2018
Dianebulley how about using different colour nail varnish for each type. That would be waterproof. If you have a laminator you could print our your labels and cut them out and laminate them. They definitely last. Our weather is such that nothing lasted until I tried laminating.
5 Feb, 2018
Well done you scotsgran.
5 Feb, 2018
brilliant scotsgran. very inventive.
Diane why not buy different couloured labels and use your black pen. I have 10 different colours as I use them as price labels.
5 Feb, 2018
Brilliant ! I didnt think about nail varnish. Have just been to the Art Shop and got 10 Sharpie colours and a red
Staedler.
The types of Auricula I have to learn are Self, Edged,
Striped, Green Edge, Grey Edge, White Edge,
Standard Alpine, Laced Alpine, Self Alpine,
Border Auricula, Two forms of Double Auricula.
They all have individual names as well !
The coloured marker pens for plant labels will help me
remember these with the list on a card in my pocket.
5 Feb, 2018
Diane the first ones are all Show Auriculas,then as you say Alpines, Doubles,Fancy,Borders although sometimes they are shown in primula sections as well,only one one missing are the stripes.
Are you thinking of showing them,I am supposed to know something about them but the Primulas were always my first love.
5 Feb, 2018
Thank you all for your compliments. Diane good you found a solution. Bjs is being very modest about his achievements. If you look at one of his blogs dated 30th March 2010 and named 'Primulas or Primroses what does it matter' you will see what I mean. The RHS list many of his Stradbrook Primulas and Auriculas.
5 Feb, 2018
Pushing the big 90 now, just curious really, showing is not a good idea for me. Didnt know that about Bjs. I am on a learning curve which is good for this horrible winter weather stuck indoors. What are Stradbrook Primulas - more Googling !
I had a row with the people at a GC who labelled Primulas as Primroses. They said that was the growers' labelled name and that was what they would call them. Have never bought any since I was so angry. Will have a look at 30th March Bjs blog.
6 Feb, 2018
Ha ha I googled Stradbrook Primulas, and Bjs blog about
Primulas came up ! Its really lovely. Saved searching.
6 Feb, 2018
Diane
Primula or Primrose they all belong to the same family Primulace so the difference is mainly visual and not something to get hot under the collar over.
6 Feb, 2018
As far as I am concerned Primroses are the wild version and they grow in woodlands - we hope. I have a patch
on my garden. Was walking in Geddington Woods years ago and found an Oxlip. Got very excited about that. Also picked up a fossilised shell.
When I took it to the Finds Day at our Museum the expert said it is an Galathaea Shell, a Squat Lobster, related to Oysters 22,000 million years old. Originally I put it on the rockery.
When I found out its age it was elevated to my desk
in a position of honour. The oldest thing in Kettering.
6 Feb, 2018
Great find. I wonder how it got there?
7 Feb, 2018
Very industrious S'gran, looks a very neat and useful way to protect your seedlings, job well done, hope your fingers didn't suffer too much, that mesh can be a beggar to work with, always a stray sharp bit that has a go at you....
7 Feb, 2018
Linclass if I knew before I started I would not have tried to make these covers because the cut wire is a menace. I am thinking it might be best to solder them together but OH pointed out that I wanted a minimum of cutting in case I want to recycle them again. You can't have everything it seems. I can't solder but OH could teach me if I get desperate.
7 Feb, 2018
Recent posts by scotsgran
- For Sbg
29 Apr, 2020
- A quick look at the garden in April 2020
25 Apr, 2020
- My new gardener
16 Apr, 2020
- Propagation part 2
27 Mar, 2020
- Spring is well on its way
26 Mar, 2020
- Propaging pleasure
18 Mar, 2020
Members who like this blog
-
Gardening with friends since
7 Aug, 2007 -
Gardening with friends since
21 Nov, 2013 -
Gardening with friends since
7 Jun, 2017 -
Gardening with friends since
10 Mar, 2012 -
Gardening with friends since
25 Feb, 2011 -
Gardening with friends since
28 Apr, 2016 -
Gardening with friends since
25 May, 2016 -
Gardening with friends since
2 Nov, 2009 -
Gardening with friends since
11 Feb, 2010 -
Gardening with friends since
22 Oct, 2008
Looks good to me you have obviously found you can bend it easily ,not quite sure how you have secured the corners but would think thin garden tie wire would do the job,the idea of being able place them in different locations is a good one.
one thing might be worth keeping an eye on i leave the zinc/galvanised mesh outside to weather as a deposit left over from manufacture can form a white powder when it becomes wet and if it falls on very small leaves will burn them,does not always happen but worth looking out for.
It is a kind of zinc verdigris similar to how copper goes green left outside
best of luck ,
I had my SRGC allocation this year lots of seed in some packets sent surplus on to Phil
x
5 Feb, 2018