Amaryllis from seed
By balcony
40 comments
There are many keen gardeners on the site but has anybody tried raising their own Amaryllis bulbs from seed? Not just bought in seed but hybridized from one’s own plants? I’ve tried it twice, once when I lived in Spain for many years & a few years ago I cross fertilized the three plants you may have seen in the photos I’ve uploaded.
I Spain I had no success at all, not a single seed germinated! :( But I never completely gave up on the idea & so when about 3 years ago all three of my plants were in flower at the same time I decided to try my hand again. I cross fertilized a few flowers & saved the seed pods till they were mature & then I saved some & sowed others. (To give me a 50% chance of getting a few seedlings).
I sowed them in a seed tray with fresh compost but being big, flat paper-like black seeds I was able to space them out well & barely covered them with a very light amount of compost, put the seed trays,( I think I sowed at least two or maybe three), in plastic bags & put them in the airing cupboard to germinate. I checked them a couple of times over a week or two & as soon as I saw a few beginning to germinate I took them out. So many ending up germinating that they became an embarrassment to me! I hadn’t counted on such a prolific germination! After a few weeks I pricked them out into individual small black plastic pots but my intention was to only put one seedling in each pot but I ended up with 4 in each little pot! They filled three or four seed trays with 15 or 16 pots in each!!!!


Their first winter they spent in those pots in the trays on my bedroom windowsill. The following spring I transplanted them into bigger pots & separated them individually. They grew quite happily all summer & survived another winter without casualties. By spring last year the were, in many cases, literally bursting out of the small pots so I decided to put the biggest into larger 5" pots which filled a 3 metre long windowsill in the kitchen which looks south west. I had bought some growing bags for tomatoes & peppers but due to the very poor success of the tomatoes I had a growing bag left over. Then it occurred to me that I could use it to grow on the amaryllis seedlings for another year, have them all in one place & save a lot of space (which is in pretty high demand on a small balcony!) ell they all grew very nicely, thank you & even survived the winter out side with no protection at all from the cold (we got down to 6 degrees below zero Celsius on one night & down to minus 3 or 4 on several other nights in February.
A few weeks ago I decided it was time to “wake” them up so I took them all out of the growing bag & put them into individual 5" pots. There were no casualties!


The top photo shows them in August, 2008, the middle one shows them bare rooted after taking the out of the growing bag & the last one shows them planted in their 5" pots just one month ago, 10th March 2009.
At the time of writing there is not much more to see but all the bulbs have an inch or two of new growth on them.
I have slight hopes that one or two on the kitchen windowsill may flower sometime this year but it would be early as they are only three years old. Next year there will be a better chance of that happening & their 5th year they should all flower – what a moment to look forward to!!! :)
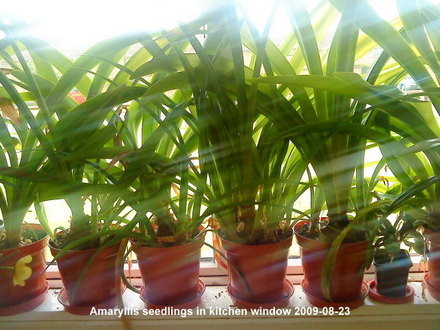
I’ve taken some photos of the “seedlings” (now in their third year) on my kitchen windowsill so you get an idea just how much they’ve grown!


Yesterday I repotted 4 or 5 of the biggest plants in to 6" pots. These are the bulbs that have produced many offspring around the central bulb. I may possibly retard their flowering by a year but I shall have many more bulbs of those particular ones – which I hope will turn out to be lovely.
Here is a photo of the Amaryllis in the kitchen window as seen from the outside!

Here is a photo of the Amaryllis at this time on the balcony, all in 12.5 cm pots.

This last one shows the last time all three colours were open at the same time (middle of February 2007) & were the ones I cross fertilized to get the seeds I eventually planted!


 6 Apr, 2009
 7 likes
Previous post: New here!
Next post: Spring flowers
Comments
What patience you have! I am very impressed and hope that you'll get some lovely interesting flowers to show us! :-)
6 Apr, 2009
What an interesting blog, not sure if i'd have patients for it, but well done.
6 Apr, 2009

Wonderful !
It will be interesting to see what colours they all are. I hope you'll still be with GoY when they flower so that you can show us.
6 Apr, 2009
Never tried to do that but very interested and hope it works for you.....
6 Apr, 2009
What a great reward for your patience. Just think, you may get some surprises so beautiful you will be able to market them with a new name (after another five years to grow on more bulbs).
7 Apr, 2009
It wouldn't be bad, Wagger, if I could do that! :) I do like them, but it's such a shame that within two weeks they have all gone! :(
I lived in Spain for many years & took a bulb with me that one of my sisters had given me for Christmas the year before. I planted it on Christmas Day & EXACTLY 2 months later the first flower opened!
That same year, 6 months later I moved back to Spain with my wife & kids. Needless to say I took the bulb with me. As the climate in central Spain suits them to a "T" I found they not only flowered profusely every year but they increased as well.
I have photos of dozens of pots of them all flowering at the same time with up to two stalks at a time with another 3 or 4 flowers on them.
7 Apr, 2009
That must have been an absolute picture!
7 Apr, 2009
Ok I m very impressed this is amazing you really out did your self. I love these and I want to know how you did it way way cool give me instructions ok....You are like a green body not thumb truly this is so way cool to me and I can grow anything my kids tell me all the time. I want to try this.
10 Apr, 2009
Are you serious, Lujean, about learning how to grow Amaryllis bulbs from seed? If you are you need to start with a couple of Amaryllis bulbs & when they flower transfer pollen from the flower on one plant to the flower of the other bulb. Then wait for a couple of weeks to see if they have fertilized, when this happens you will get a big 3 lobed seed head. When it is ripe it will start to split open along the sides. Then you take the pod off the plant open it up & lo! 100s of very, thin black discs, in 3 rows, with a tiny bulge towards the centre of each disc.
Unless you have a flowering bulb now this process will take about 6 months from the planting of the bulb - your first step on the patience ladder! :)
10 Apr, 2009
Hi I Have read with envy at your diligence and success with the amaryllis seeds you collected. I had an amaryllis as a Christmas present and it was wonderful - producing two flower stems and a glorious display. It must have self fertilised because I have just harvested all the seeds from one seed head that developed as you describe. Can you please continue with instructions as to how and when to start my attempt at germination.
30 Apr, 2009
Hi, Mrshyde, you are lucky to get some without doing it on purpose. You now need to sow them as soon as possible but remember they may take up to 5 years before you see a flower! Mine are in their third year & the biggest are now in 6" flower pots in the kitchen window.
I laid them flat over the surface of the compost with a small space between them, look out for those that have a tiny bump in them, they are the fertilized ones. Normal seed compost is quite sufficient. Just cover them with enough soil so you can no longer see them. Put the seed tray in a propagator or inside a plastic bag & keep it somewhere warm, if you haven't got a heated propagator, in an airing cupboard. I found they germinated in less than a week. So don't forget to check them after a few days. You can leave them in the seed tray till they are big enough to move to small, individual flowerpots till the autumn.
When you do transplant them make sure the bulblet is hardly covered by soil. They don't like to be buried & may rot.
Let me know how you get on.
1 May, 2009
Hi
Have just sown my seeds as you suggest and have put them in my always warm bathroom. So will await developments - or not!
Thanks for your advice.I don't regard myself as good with house plants but some things seem to survive despite my erratic attention so we shall see.
5 May, 2009
Good for you, Mrshyde! I hope you have at least as much success as I've had up till now. Do let us know how you get on.
6 May, 2009
Eureka! I have 4 little shoots.
They actually took about 10days. I was checking each day after 3days but we went away for 5days on day 7 and the day before I went I saw that a couple of the seeds had pushed up to the surface and could just see a little rootlet. When we came home there were 4 x 2" high green shoots!
29 May, 2009
Congratulations, Mrshyde!!! :) I got an embarrassing amount of seeds germinating - & I didn't sow all of them! I still find a few seeds turning up now & then!
Now you need to move them into small pots 2"-3" is adequate until the autumn, in fact a 3" pot will see them through their 1st year. In their 2nd year you can move them to 4"-5" pots where they can stay for a further year.
You will need a frost free place to overwinter them but during the summer & autumn they can do very well out of doors - only be careful of SNAILS - they love to munch on the leaves as I discovered the first year I had them outside on my balcony, I found slime trails & stripped leaves, as the small pots were close together in seed trays they managed to find their way down between some pots to hide during the day. I discovered them soon enough so as to not loose the tiny bulbs! They have also munched on the big bulbs but that wouldn't kill them like the tiny ones.
Be careful not to bury them - they will rot quickly if you do. The first year they can be covered just a little so as to keep them upright but when the bulblet is visible try to keep half the bulb above the soil.
29 May, 2009
Thanks very much for the info. I'll do my best to keep them going.
I still have the original bulb with big leaves on it looking quite vigorous. it is actually growing hydroponically and I can see its masses of new roots too! I'm not sure what do do with it. Is it likely to flower again?
1 Jun, 2009
I've never grown them that way! Hyacinths, yes, but not Amaryllis! I've always grow them in compost in pots.
If you can see the new roots forming it's probably too late to put them in pots. If I were you I'd leave it where it is for this year. What you can do is try adding diluted fertilizer to the water it is in. If you do this once a week it should continue to grow during the summer. I don't know if the leaves will yellow in the autumn but if they do you could take it out of the water & let it dry off naturally & then keep it dry till the end of winter. But we can talk about that if it survives the summer!
Above all keep the base of the bulb out of the water or it will rot!
1 Jun, 2009
I am pleased to say that my 4 seedlings are looking very well and now in 4" pots.I also have a 'runt' which germinated later from the mass left in the seed tray and that is coming along nicely behind the others.
My original plant which was given as a present to be grown hydroponically has flourished on until now, plumping itself up again nicely. I have now taken off its water source to dry it out and let the leaves and roots die back.
7 Oct, 2009
It's so good to hear from you again, Mrshyde! :-) I'm so pleased for you that your seedlings are growing well! Mine are very big now & I'm finding it difficult to accommodate them! LOL!
I'm also pleased to hear that the original bulb is still doing fine. I, myself, have never tried to grow them in water. I've only ever grown Hyacinths that way!
The biggest bulbs are growing on the kitchen windowsill in 6" pots. Some of them have produced so many offsets that the bulbs are bursting out of the pots! See the new photos in my blog above.
You will need patience as your seedlings will not flower for several more years yet. I hope to see my first flowers next year sometime.
11 Oct, 2009
What a great blog! It's very fascinating to read through it and see everything documented with pictures. Your seedlings look great. It's a joy to look at them. Congratulations,
Bob
29 Dec, 2010
Hi, Bob! Welcome to the forum. Hope you will continue to tell us how you are getting on.
I'm pleased you liked this blog! I hoped it would be interesting & instructive as I was making it up. It seems that that is what has happened. :-))
I read with interest your blog on Amaryllis, too. I loved your photos but I've never grown them myself.
All the Amaryllis from seed flowered & spent the summer months on the allotment. Unfortunately some insect bored into the heart of some of the bulbs & destroyed them. Well at least I had to throw them away. Even so I ended up with at least as many as I planted! In my fortnightly blogs on the allotment I include some photos of the Amaryllis. Some didn't flower at home but they did on the allotment later.
You will find more photos of my plants if you look in My Photos. See pages 8 & 9 for more photos of my Amaryllis from seed in flower.
30 Dec, 2010
Amaryllis,
Wow, so may at once..that is awesome....It is so cool to see them from seedling all the way to flowering blooms...I actually love the idea of putting the seedlings in the growing bags!! I may have to try that one of these days!!
I love the way they look in the windowsill!!
Sandra :)
14 May, 2011
Hi Sandra, Glad you liked the blog - I was sure it would interest you! :-))
The growbag idea was a way to maximise space on my balcony & it was the most practical method for getting so many seedling together in one place. I think that being for tomatoes they would have had extra potash which may explain why I got so many flowers & so big the first year of flowering!
There is a sequel blog here:
http://www.growsonyou.com/balcony/blog/9726-amaryllis-seedlings
where you can see the bulbs in their first year of blooming.
15 May, 2011
Thank you, I am going to the link now :)
Sandra :)
20 May, 2011
Have a lot of amaryllis seedlings that I germinated in a flat after propagating the seeds from two adult plant blooms. After a month I transplanted individual seedlings into cocoa starter pots. The first year they were wintered indoors and watered/fed weekly through the winter. They are outside now and I have repotted them into larger pots. Does anyone know if the seedlings have to be watered through the second year? I am short on space with the larger pots and if the seedlings can be dormant, they will take less space. Please let me know. Thanks much in advance. The plants have to come in for the winter - temperatures can go to 0 degrees F.
13 Aug, 2011
Hi Patmanion & welcome to GoY! Pleased to hear you have successfully grown on some Amaryllis seedlings! :-))
I don't think it's a good idea for them to dry out & go into dormancy through the winter while so small. Personally none of my Amaryllis have been in hibernation as yet, though, like you, I have little space & am thinking of drying them out in October this year for the first time. They are big bulbs & hibernation won't hurt them.
You don't say what size pots you are using but 3-4 inch pots with do them through their 2nd year. Continue to water/feed during the summer ONLY. They need very little water during the winter, unless they are in a very warm place, they will probably get by with a little water once a month. They won't be actively growing so won't need much. Don't feed them until they are growing actively in the spring then use a tomato or rose fertilizer as they have lots of Potassium which is needed to build up big flowering bulbs. NEVER feed plants during the winter. It won't be used & will only lead to a build up of salts in the soil.
Keep the plants in a frost free location with good light. The little bulbs will grow very strongly during their 3rd year & will need 5 or 6 inch pots when they begin their 4th year when they will probably bloom.
My seedlings have now become commercially sized bulbs & a 6inch pot seems to suit them very well. They are now in their 5th year. I'm feeding them weekly with a tomato fertilizer.
17 Aug, 2011
Quite incredible! I never even imagined germinating these from seed!
As I only have one at present its highly unlikely I will get seeds but I shall be looking for another bulb to grow ~ if I do get seeds its a bonus but if not I shall just enjoy the flowers!
16 Jan, 2013
If you get any seeds they are easy-peasy to grow from seed, just you need patience as they take 4 years from seed to flower!
17 Jan, 2013
thats a long time!!! i dont mind waiting 4 years ~ its finding the right place to put them!
17 Jan, 2013
That's probably the most difficult part!
21 Jan, 2013
:-) I dont think I will ever have enough space!!
21 Jan, 2013
You can always double up & put them in tiers like I do! LOL!
26 Jan, 2013
the OH will have something to say about that ~ he already thinks i have too many orchids!!
26 Jan, 2013
I'm fortunate then as my wife doesn't normally say anything!
28 Jan, 2013
good that you both like them!
29 Jan, 2013
Actually she not too keen on these flowers :-(( She likes others I grow & I always grow a few Carnations for her as she says they remind her of her home town in Spain! As I also like them very much it's no sacrifice! LOL!
2 Feb, 2013
Carnations are beautiful! Are the ones you grow scented?
2 Feb, 2013
Wow! I loved this blog. thank you for the pictures. this way I can check mine to see if they are growing properly. Just waiting for mature seeds. Lets see what happen.
21 Oct, 2018
Glad you found this blog useful, Aleyna! Let's see if you can do one like - in a few years time!
21 Oct, 2018
Featured on
Recent posts by balcony
- Seed Bank
25 Jul, 2025
- Planters around cash machine 2025
28 Jun, 2025
- Using Baking Soda around the garden
28 Jun, 2025
- Trouble with GoY
6 Jun, 2025
- Happy Christmas
19 Dec, 2024
- Another look at the planters ...
21 Nov, 2024
Members who like this blog
-
Gardening with friends since
29 Mar, 2008 -
Gardening with friends since
29 Dec, 2008 -
Gardening with friends since
22 Oct, 2008 -
Gardening with friends since
1 Mar, 2008 -
Gardening with friends since
1 Mar, 2009 -
Gardening with friends since
1 Apr, 2009 -
Gardening with friends since
10 Sep, 2010
Congratulations on your prolific success! It's a shame you have to wait so long to see them flower but it's something to look forward to. Hope you get an interesting hybrid.
6 Apr, 2009