Replacing a pond liner and creating a new pond.
By anchorman
10 comments
The following sequence shows the process of replacing the liner and recreating the pond.. I wrote this piece for a sequence of photos on my flickr pages
Here’s a link to my flickr homepage
http://www.flickr.com/photos/31559373@N00/

I built this pond about 5 years ago. Unfortunately the liner has sprung a leak. A mouse or mole has chewed through the liner! .

Old pond liner removed,pond deepened and a trench dug around the edge, into which will go a weed proof barrier which lets water through. This should stop the dreaded mares tail weed which is endemic in this part of the garden The amount of extra soil removed was extraordinary. (27 wheel barrow loads) ! The blue container in shot held all the tadpoles and other wild life I rescued from the old pond. I’ll be very happy to get them back in to a decent sized pond
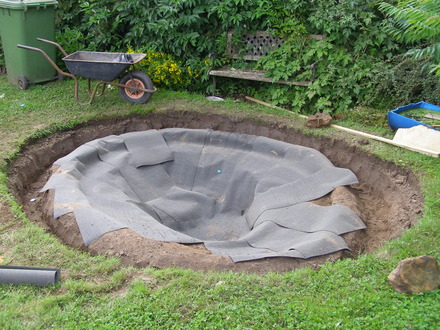
To try to stop mice and moles damaging the butyl liner I’ve covered the pond with roofing felt. This will certainly protect the liner from stones and I hope the mice/moles will not like it’s taste. One roll ,8 metres long by 1 metre wide covered the whole pond which measures about 3 metres 10 feet by 2.5 metres and cost just over £10.. The felt was surprisingly easy to lay and because it was a reasonably warm day it was easy to mould to the shape of the pond. This process took less than 30 minutes. An alternative to the felt would be a mix of sand and cement to a depth of an inch or two . The mixture can be spread dry and will set naturally due to the damp in the ground

Butyl liner being filled and I’ve put back in all the saved wildlife from the old pond. The butyl liner measures 4 metres bt 3.5 metres and cost £40.
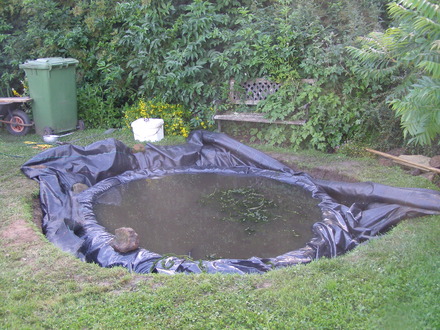
To check how big a liner I needed I laid a flexible tape measure ( or you could use a piece of string) from one end of the pond to the other following the contours and added a bit at each end just to be sure

The idea is to cover all the pond liner and have the water cover the bottom of the stones to make it as realistic as possible.
The pond liner will go up about 3 inches behind the stone edging and the ponds water level can then be raised another inch or so totally hiding the liner from view.
I need about 50 stones to surround the pond and they would have cost £2 each at the local garden centre which I think is a rip off. I got my stones for a total of £6 from a local quarry.
You could use paving slabs or bricks but make sure you allow some way to let animals get in and out.. A small ramp would do the trick

Most of the hard landscaping complete. I’m not totally happy with the positioning of some of the stones so I’ll change them around a bit tomorrow. After that I can start to replant.

The green line = the pond liner, red line = protective matting and blue line = water level
A pond designed like this will allow wildlife to escape the pond via the shallow sloping beach.eg frogs. Also if a hedgehog falls in ,which they do surprisingly often, they can walk out up the beach.
The lip at the bottom of the beach underneath the water stops pebbles dropping into the deeper water.
The large black blobs represent stones, pebbles or bricks which cover the liner making the pond look natural. Note the water line is half way up the stone on the left hand side and 75% up the beach on the right hand side. The pond liner goes up behind the perimeter stones to hold water in so the water level completely covers the flexible liner
The pond should ideally be 60 cm deep or more. The deeper the pond the more stable the water temperature is in hot weather and the less likely it is to freeze all the way to the bottom.
 28 Aug, 2010
 11 likes
Previous post: Building a pond + other stuff!
Next post: Plant auctions
Comments
Phew! That was a bit of a mission! You need true dedication to dig all that out & re - plant everything.
Lovely to hear you talk about the wildlife & their escape routes ... too many folk don't think of that when they dig a pond.
28 Aug, 2010
I enjoyed reading this. Our pond is a raised brick job so it was less complicated. It will look lovely when it settles.
28 Aug, 2010
Thanks for your kind remarks
Seaburngirl
28 Aug, 2010
Well done, interesting blog and an excellent pond for all including the wildlife.
28 Aug, 2010
Wow, a lot of thought has gone into this pond. Your photos and notes are very informative. I'll be looking out for another installment when the project is further along. Well done, Anchorman!
28 Aug, 2010
Anchorman I only joined a couple of days ago. I am going to build a pond in my garden and was dircted to this blog by another member, it's great and has given me a good insight into what I need to do, thanks
1 Sep, 2010
Thanks for your comments Jim. If you have any queries please feel free to ask here. I've built quite a few ponds in the past 20 years or so.
1 Sep, 2010
I love this blog and your pond :-)))
16 Sep, 2010
Featured on
Recent posts by anchorman
- A visit to a local iris nursery on 2nd June 2012
2 Jun, 2012
- New Border in my garden
9 Aug, 2011
- Would anyone like to swap some hardy Tradescantia?
1 Jul, 2011
- Kings Lynn Park
3 Dec, 2010
- Plants with a very long flowering season
20 Nov, 2010
- Patio and pond project at my old home
18 Nov, 2010
Members who like this blog
-
Gardening with friends since
14 Aug, 2008 -
Gardening with friends since
21 Jun, 2009 -
Gardening with friends since
10 Mar, 2010 -
Gardening with friends since
22 Aug, 2010 -
Gardening with friends since
23 Jul, 2010 -
Gardening with friends since
8 Aug, 2010 -
Gardening with friends since
29 Apr, 2010 -
Gardening with friends since
23 Aug, 2010 -
Gardening with friends since
27 Oct, 2009 -
Gardening with friends since
28 Feb, 2011 -
Gardening with friends since
13 Aug, 2011 -
Gardening with friends since
13 Apr, 2016
-
Nymphaea 'Aurora' (Water Lily)

£22.99 at Crocus -
Complete Pond Plant Collection* (15 Plants)

£15.90 at Unwins -
Nymphaea Alba (White Water Lily)

£22.99 at Crocus -
Lysichiton Americanus (Skunk Cabbage)

£8.99 at Crocus -
Nymphaea 'Marliacea Carnea' (Water Lily)

£22.99 at Crocus -
Easy Clear Filter And Fountain Pump

£139.95 at Ferndale Lodge -
Solar Lily Pad Fountain

£39.95 at Ferndale Lodge -
Refill Pond Pads

£8.95 at Suttons Seeds -
Pond Care Net Set

£35.95 at Ferndale Lodge -
Pondvac

£24.99 at Suttons Seeds
Well done Anchorman... useful blog :o)
28 Aug, 2010