Building a wildlife pond - Part 2
By sean50p
2 comments
You can find Part 1 here
So, hopefully you have thought about the location, shape and size of your pond. Now it’s time to get your hands dirty.
 This space is just crying out to be used. (Cam C902)
2. Clear the top surface area of the pond from gravel, turf, grass etc and either reuse in other parts of the garden or keep to one side for any finishing touches.
This is a simple task and can be done in a spare half an hour, maybe after work through the week.
3. Before you dig know where the excavated soil is going to go.
This might seem like a simple consideration but believe me, more soil comes out of the ground than you can ever get back in. What I didn’t consider until I starting digging was how compacted the soil was. The very act of digging aerates the soil, which means you have about twice as much in volume to dispose of as comes out of the hole.
Think about where this soil will go, unless you can disperse it elsewhere in the garden or you are planning to use it as the base for a rockery or other raised feature, you will have to order a skip and have it taken away.
I didn’t consider this and had to do a bit of garden design on the hoof. I ended up creating a whole new bedding area as a result.
 After my first session, clearing the gravel, having a bit of a dig and realising I was going to have a lot of soil to get rid of. (Cam C902)
4. Dig the pond site to your planned shape and depth.
I dug the pond over a few days as I was re-depositing the soil as I went along. I only have a small pond and I still found this hard work so spread it over a couple of evenings after work so that I could do the liner at the weekend. I also didn’t want to make myself sick trying to do everything in one go.
 Doesn’t look any different but I removed lots more soil. Looks like I settled on a giant foot shape! (Cam C902)
Any larger stones I kept to one side until I was completely finished in case they were needed later.
5. Measure the deep end to make sure you are down far enough.
Dig a hole approximately 20cm deeper than required to allow for sand, matting and liner. Remember the deepest point needs to be at least 75cm so adding the 20cm mean a hole depth of 95cm. You don’t have to have a even depth at the bottom, as you can see below I opted for a deeper section to one end.
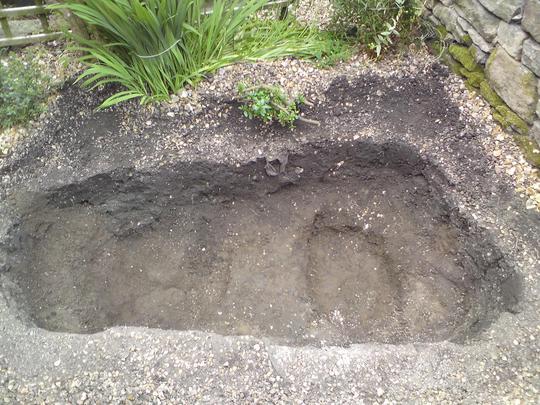 A final deep hole that should resist freezing. All roots and sharp stones removed (with a cut finger for my troubles) (Cam C902)
6. Clear the hole of any stones, roots, sharp edges and loose dirt.
This can be time consuming but the more diligent you are the better for the pond and the less likely you are at putting a hole in the pond liner. You’ll notice all the roots in the first photo have disappeared by the second photo.
You can find Part 3 here
You can find Part 4 here
 13 Aug, 2011
 1 like
Previous post: Building a wildlife pond - Part 1
Next post: Building a wildlife pond - Part 3
Comments
Ta, it's a great addition to the garden.
13 Aug, 2011
Recent posts by sean50p
- 50 Snakeshead Fritillary for only 1p + P&P (£4 total) @ JParkers
8 Oct, 2011
- Collecting Seeds from Columbines
16 Aug, 2011
- Building a wildlife pond - Part 4
13 Aug, 2011
- Building a wildlife pond - Part 3
13 Aug, 2011
- Building a wildlife pond - Part 1
13 Aug, 2011
- Breaking the ice...
13 Aug, 2011
Members who like this blog
-
Gardening with friends since
29 Mar, 2008
Hope you enjoy your pond as much as i love mine. i love the sound of water in my garden.
13 Aug, 2011