Garden Projects 2009 - Part 1 - Planning, Plants, and Ideas......
By majeekahead
37 comments
Hello everyone! For me this really is the time of year when my green fingers really do start itching…the garden is pretty bare…the weather never how i need it to be on the rare occation that i get the time out there to ‘play’….but it is also the best time of year for planning changes. You can see the back bone of the garden, and as unable to get out there and do, i spend a lot of time thinking and planning…..ooooohhhhhh sooo exciting!
Some of you may remeber reading my blog on New Years Eve, all about how my garden changed during 2008. It is a reletively new garden, and as we all know getting it just how you want it takes time, trial and error, lots of mistakes along the way and constant changing till you get it just right…and to be honest, even when I do get to the point that i like what i have done, I soon get bored or move house! lol. And i think that is the beauty and fun of this hobby that we all have, nothing ever stays the same, always room for improvement. and the only way to develope a garden is with change.
So here we go, this is what is on the drawing board for 2009…this will proberly be one of many blogs on this as quite a lot planned, and i really enjoy all of your imput along the way. So hope you don’t get too bored of reading about my garden, coz i know i will never get bored of writing about it lol.
The main focus of change this year is the back end of the garden, it is just an eye sore! very important that i have everything that is here, but do i really want to be looking at it? NO i think not…i have found the shape of this garden very challenging…in the past i have worked with the perfect square, the postage stamp size, and an L shape, both of which fell into shape fairly quickly..
this garden is long and thin, and goes into a point at the end, drawing the eye to the ‘ugly bits’. last year i managed to break the space up a bit creating rooms with trellis pannels, but still not enough, the focal point of the garden is still the greenhouse, shed and composters mmmmmmmm……
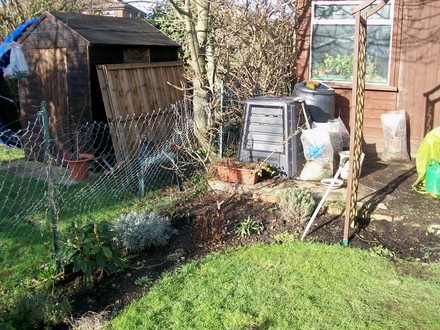
Well i don’t think i will be winning any prizes for this little master peice!…But this will be one of the first areas hit this year. The compost bins have seen better days, so they are soon to be replaced with Dr.Bobs pallet sagestion. In front of them i currently have the high light of the winter garden…my lovely Witch Hazel, just coming into flower…can you see it?….it is there….honest!…obvioulsy completely wrongly placed hiding away at the back of the garden, with nothing behind it to bring out that lovely colour. it will soon be doing a swap with Brookes Play area. I have decided to put a living willow te-pi here which once establihed should do a better job of hiding the compost area. and should make a very fun and much more grown up camp for her and her friends.
Currently Brooke has a play house in front of the willow screening i put up last year in an attempt to hide the dumping area behind next door shed…

as you can see this has quickly become a dumping area for all of the toys she has grown out of. and not hugely effective at hiding anything – more like drawing attention to it.
And then there is the focal point of the whole garden….

WOW stunning feature! …….what you don’t think so?….no me either..
well for this area, i have a few things to do, this is going to be the bigest job of all, so will be done later in the year. Removal of the little concrete step. followed by the 2 trellis pannels i have left over, and willow screening in front of the greenhouse, securing of the arch in the the middle so it links with the trellis that will be in front of the greenhouse, because lets face it, it stands out like a sore thumb at the moment. and then finishing touch of my bench in front under the Acer tree to finish it off….
Right, first job is to move the play house…

Well it looks a bit better already, As the bench will be facing the house, i need to make something a bit interesting and eye catching to look at in this area, so the eye is not drawn directly towards the house. It’s quite a nice house but would much rather be viewing some garden loveliness whilst relaxing on my bench in the sunshine. David once said to me that to effectively screen something you don’t need to put something right in front of it…and you know what David you are right, i can make this long garden work to my advantage by bringing out the woodland bed by a few feet. I am not happy with the shape of the grass area at the moment anyway, its too higgly piggly, and dispite my trellis pannels the destination up and down the garden is still a straight direct line, there is just not enough secracy to this garden the way it is. I think planting a group of large and interesting shrubs basically in the middle of the garden, will solve all of the above problems….sound radical? well yes a bit, but i think it will work….
here is what i am thinking – hope you can see the white string, this is marking the edge of where the bed will come out.


Well thats the plan…..I have already thought about what i want to plant here, thoughs of you that know me well, will know i don’t do things by half. I am working on a buget, so what i buy will have to be small to start with as cost is a big factor, so will have to wait a few years for the desired effect. but what i have chosen is releatively fast growing, obvioulsy the Witch Hazel, i have just ordered Sambucus nigra ‘Black Lace’ and an Eunoymus alatus, i also have a dwarf Pittosporum ‘Tom Thumb’, and a Cotinus (yellow one) which needs moving. and i also have 2 dog woods one orange and one yellow stem that are possibilties if room for them. i do want the overal look to be large and a bit overgrown, the things i have chosen i think will quickly grow and give the desired effect, it’s not a problem to give them a good hair cut every so often so they stay the size i want.
well thats the plan….what do you think? i will keep you updated on progress
just a quick update for you all….i did brave the mud bath today, just for an hour to map out the bed properly. and i have to say, i am really liking it, just from this you can see how much it will change the overal feel of the garden. it is an idea i have been toying with for a while, but seeing it like this i really do think this is gonna work….next step digging!….but that is for another blog.


 22 Jan, 2009
 10 likes
Previous post: Freaky Soil - What Does This Mean?.......
Next post: Garden Projects 2009 - Part 2 - More Planning, Digging and Buying Plants....
Comments
Great plans. Planning is such an exciting stage, imagining how things could look.Really intersting. Will look out for your progress reports.
22 Jan, 2009
thanks for the incoraging comments, i should really be getting on with the house work, but i think i can see the sun just trying to come out, Brookes at school....oh well hovering and dusting can wait can't it - you may not have to wait too long for the next installment!
22 Jan, 2009
Well you have done some planning, i'm thinking of changing my garden, infact i did some drawing's last weekend,i know what i've done on paper and how i wont it to look, but because i'm no good at drawing folks can't make head or tail of what i've done, but i can follow it, & as long as i know that will do me.
22 Jan, 2009

Well done Ang. It looks like its going to be great. It is exciting when you make plans. I look forward to updates on your progress.
22 Jan, 2009
It looks like a good plan to me Angie. I'm looking forward to seeing it develop.
22 Jan, 2009
thank you, and Clarice, i am the same, i very rarely do plans on paper it is all largely done in my head and from laying things out on the ground, i find it much easier to see where i am going like this, i find it hard to imagine what it will look like on paper, and rubish at drawing lol. but i gues everyone is different just about finding a way that works for you is'nt it. so at the end of the day, does'nt really matter if no one else can follow as long as you know what your doing!
22 Jan, 2009
Thoughtful design and much to look forward to in the new season. My first season crocus plants have just poked their little heads up and I was excited as a kid on Christmas day.
22 Jan, 2009
Good to hear you've done your planning first majeek - that's the way I tend to work too. I may be a step ahead of you though as I'm ordering plants this week (for delivery in March)
22 Jan, 2009
thanks Ams and Andrew, if you do it this way Andrew, then i must be doing something right! lol to be honest, the main plants for this display are already ordered, ofcourse there will be other things i will need for gap filling, thoughs i will wait and see what i need, once i get to placing stage. once the back bone is placed how i want it, i will plant and look at it as 2 seperate beds, the view from the bench and the view from the patio. as the main planting with the big stuff will be coming from the fence to the edge of the bed, where the widest part is, so once established will pretty much block the view, ofcourse i want it to tie together, but if i work this all out right you won't be able to see it all at once, you will actually have to move around to the garden to get the full picture. i can see most of it in my head, but i never usually know just how good it will look until i start placing then the inspartion really starts to flow. i am really excited about this project, i think once completed it will make the rest of what i have done fall into place, well i hope....i have been out there today braving the mud bath, just to map out this bed properly...i'll load on the latest pictures for you to see, much clearer than the white string.
22 Jan, 2009
One tip I picked up from a gardening book - once you are happy with the shape of a new border, use a half moon edging tool and cut about an inch either side of your piece of string (or just use a spade). Peel back the turf in between the two cuts and hey presto, the edge of your border is visible and you can take your string away before starting to dig the new area
22 Jan, 2009
Great Idea Andrewr il remember that Myself:)
22 Jan, 2009
LOL - great minds think a like Andrew, that is just what i did! - i think we must read the same books!
22 Jan, 2009
Interesting blog.
I'm looking forward to seeing your progress during 2009 :o)
22 Jan, 2009
Well, a great start to the new-look back garden, Angie! You were lucky with the weather - I'm glad. My trouble, like yours, is that once I have an idea, I just HAVE to get going on it!
22 Jan, 2009
thanks TT, and Spritz, lol - i am affraid patients not one of my virtues!....and it was like a mud bath today, but i will be back out there in the next few days digging - regardless.
22 Jan, 2009
The view of the greenhouse will be a thing of the past - really well planned and makes a very shapely lawn.
23 Jan, 2009
I like the shape of the lawn Maj. it flows in bends like a river and where you have broken the length with trellis will look lovely when your plants have grown up them , I,m looking forward to seeing it progress .........
23 Jan, 2009
Thanks Wagger and Amy, i am really pleased with it too, it finally feels right, each time i have made a change so far, i have been happy with what i have done, but still not quite right if you know what i mean, but this time i think i may have cracked it, well we shall see....
23 Jan, 2009
Well, Angie, you have set yourself some hefty targets, haven't you? I'm sure you'll achieve themn all, however. looking forward to seeing your progress. Pittosporum "Tom Thumb" and Sambucus "B;ack Lace" are favourites of mine, too. :-)
24 Jan, 2009
You have got a lot of exciting ideas, cant wait to see it all, you have a fair sized garden so flowing beds look good,we all need a change and having a project keeps us focused, like your choice of plants, have a couple of Pittosporum but not Tom Thumb, on my list to buy and Sambucus BL is lovely, good luck with the planning.
24 Jan, 2009
thank you, i am going to brave the mud later today regardless, it has been raining all night again so would imagine it will be good fun out there lol but so much that needs doing, and i have to get the witch hazel and the other plants in the corner moved before i can start on the te-pi and best to do the te-pi while dormant, so don't have long to get going, and yes i do love to aim high, should get it all done though, it is mainly the weather preventing me at the moment.
25 Jan, 2009
Good luck out there in the cold rain today !
25 Jan, 2009
Great blog I enjoyed reading it and looking at all your hard work
25 Jan, 2009
follow the yellow brick road follow the yellow brick road la la la lol looking fine what a lovley shape gargen.it makes my mind go on overdrive looking at it.bring on the spring
1 Feb, 2009
lol thats already been done NP, have a look on Davids page.... he had a proper oz garden at his last house, absolutely fantastic! i think he is doing charlie and the choclate factory at his new one....i am going for encharntment and mistery. rather than munchins lol...watch this space to see the results. ;-)
1 Feb, 2009
ow i cant weight to see it and davids
1 Feb, 2009
thanks NP will need a bit of imagination when it's all done as will need to grow a bit before it will really work. and have you been on David's page? he has loads of picture of his oz garden, it really is fanastic, even the plants have relevant names, go have a look....
1 Feb, 2009
ow i got to lol
1 Feb, 2009
i love the way the border is shaped Majeekahead, it looks fantastic look forward to seeing it with flowers etc in spring/summer!
17 Feb, 2009
thanks Sewing, i have just been tweeking the next installment of this, so you won't have to wait long for the update. have been quite busy, all taking shape nicely.
17 Feb, 2009
ive said it before and ill say it again your doing all the right things.your lucky to have a garden that shape.what sprang to mind when i sore your bigger flower beds.turn the lawn into a winding wide pathe and have bigger flower beds.you could always get some stepping stones and lay them down a completly seperate course including going though your beds.you dont have to listern to me lol.looks realy cool.you are better going with what youve got as a garden than trying to change it if you know what i mean.you sound like and look like you got it sorted
17 Feb, 2009
NP great minds, i have plans for a stepping stone path going through the largest bed....i had some single stepping stones through it before widening it. not quite sure how it will work yet, but i may do odd stones, dotted to allow access to the back and then can have pots on them when not in use. or i may go the whole hog and put in a little path, maybe with wood retainers and bark, not sure yet how it will work. need to get the bed organised first lol
18 Feb, 2009
sounds good keep up the good work lol
18 Feb, 2009
thanks NP will do :0)
19 Feb, 2009
nice one
20 Feb, 2009
Recent posts by majeekahead
- Marmite Flowers..........
1 Nov, 2009
- My Autumn Garden.........
29 Oct, 2009
- Garden Projects 2009 - Part 6 - Greenhouse Corner - Hiding Ugly Bits.......
26 Jul, 2009
- Zombie Rock Rose Dilema........
21 May, 2009
- Garden Projects 2009 - Part 5 - Water garden, More Digging And The Best Bit........
13 Mar, 2009
- Garden Projects 2009 Part 4 - How to Build A Willow Te-Pi
2 Mar, 2009
Members who like this blog
-
Gardening with friends since
4 Feb, 2008 -
Gardening with friends since
22 Jan, 2009 -
Gardening with friends since
12 Jan, 2008 -
Gardening with friends since
29 Mar, 2008 -
Gardening with friends since
16 Jun, 2008 -
Gardening with friends since
17 Apr, 2008 -
Gardening with friends since
27 Oct, 2008 -
Gardening with friends since
24 Jun, 2007 -
Gardening with friends since
14 Aug, 2008 -
Gardening with friends since
27 Sep, 2008
Itl look Fab Ang im sure as everything else uv done up2now has made such an improvement to your Garden :)Cant wait2see more Pics when alls done :)x
22 Jan, 2009